 Google Safe
 EN
EN
 FR
FR DE
DE NL
NL ES
ES IT
IT PT
PT Game Giveaways
 D2R Boss Drops

Lost Ark Ultimate Glaivier Guide: Best Gears, Stats, Engravings, Skills Of Pinnacle Glaivier Endgame Build
4/25/2022 5:56:02 PM
Are you putting in the grind to fully prepare for the arrival of the Glaivier class in Lost Ark? Now check this Lost Ark ultimate endgame Glaivier guide, we give you as much insight about a class as we possibly can to help you figure out if it's the right one for you to either make an alt or fully main swap. This build guide will be focusing on utilizing the pinnacle class engraving over control, class pros & cons, raid build mobbing skills, awakening skills, skill rotation, stat priority & gear, engravings and gems.
Lost Ark Ultimate Glaivier Guide: Stats, Gears, Engravings, Gems, Skills Of Glaivier Pinnacle Endgame Build
Glaivier Overview
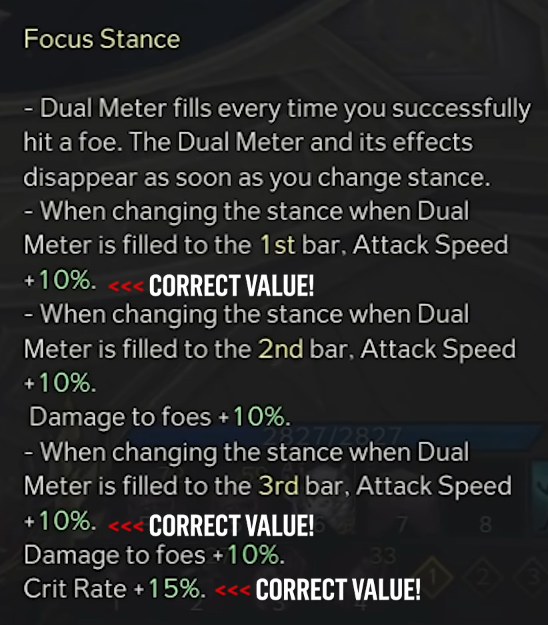
If you've been looking for a highly mobile close to mid-range stance dancing monster, but didn't find deadeye or gunslinger to be your cup of tea, Glaivier might be the one that you were actually looking for. She touts two distinct skill sets that you can swap between called focus and flurry, each stance represented by one of her two weapons. While in focus dance otherwise referred to as red stance, the Glaivier will wield a short spear to unleash a furious barrage of attacks that are more up close and personal. She will be taking advantage of her high chance to crit. While in flurry stance otherwise referred to as blue stance, she will instead utilize her glaive to hit targets further away with graceful sweeping attacks. You can press your z key at any time to swap weapons and change between your focus and flurry stances. But to fully take advantage of stance swapping, you'll need to understand how her dual meter works. As you deal damage to enemies with your skills, your dual meter will charge, filling up to three segments in a u-shaped pattern. Depending when you swap stances, the level of your meter energy at that time will determine how potent of a buff you receive for 12 seconds. The base level buffs are as follows:
First up, swapping from flurry to focus:
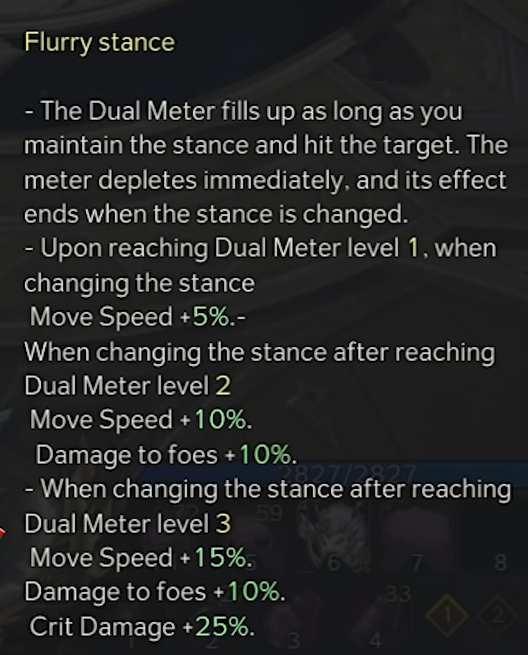
Swapping from focus to flurry:
Pinnacle Engraving Overview
Pinnacle engraving variant of this class takes full advantage of stance swapping and replaces your meter with a much more potent buff. This will instead make your level 3 flurry stance buff, grain a 15% damage increase, a 15% attack speed increase and a 25% crit chance increase. Your level 3 focus stance will grant a 20% damage increase, 15% movement speed increase and a massive 50% more crit damage. This is what many others believe to be the better variant of this class. If you are someone who feels a bit intimidated by stance swapping or you just don't like the feel, you can look into the control engraving variant instead which will lock you out of your focus stance in exchange for all your flurry skills doing 36 more damage across the board.

The general play style of this class will have you wanting to rotate skills within the same stance to fully charge three bars of your identity gauge as quickly as possible. Before switching to your other stance to take advantage of your buff. The same thing applies once you switch stances and gain that buff, rotate through your skills again quickly to get your identity gauge to three bars and swap stances again. Doing so with an endgame build will have you maintaining your buff with a 100% uptime making you dish out incredible amounts of damage.
Pros & Cons of Glaiver Class In Lost Ark
Pros:
- Most skills are viable: The great thing about Glaivier is that so many of her skills are completely viable filler choices.
- Only other class with a parry: The glaivier is also the only other class besides the gun lancer that has a parry built into her dragon scale defense skill. This provides you with a panic button to super armor through boss attacks if your mobility options are on cooldown or you just want to avoid an attack.
- Skills & self-buffs provide high crit rate: Because your skills and buffs will often provide you around a 100% crit rate, you're allowed to be flexible in your positioning because the majority of your abilities say that they have back attack properties doesn't mean that you're forced to chase back attacks. Definitely take them when you can.
Cons:
- Doesn’t have a lot of engraving options: The only real downside with the Pinnacle Glaivier is that she has a lack of alternate engravings. For the most part, you'll be restricted to the pricey ones.
Pinnacle Glaivier Raid Build
When it comes to building out a Pinnacle Glaivier, a raid skill build and a mobbing skill build are almost identical. Only one or two skills really need to be swapped out. We highlight the runes that you should be focusing on for specific skills.
Main Utility Skills:
- Flash Kick: It is a Glaivier's primary mobility skill, that also deals moderate damage with a back attack modifier. We can get the skill to level 4 to grab the excellent mobility tripod adding an additional two meters to your initial dash. Also pair the skill with the “Rage rune” since it's low cooldown and already being used for mobility, this will give us a chance of granting us additional attack and move speed for 6 seconds.
- Vault: It is the Glaivier's only counter skill. We only level this to level 4 and take excellent mobility which allows our character to move forward three meters before executing this counter, giving us more mobility and gap close to your kit.
- Cutting Wind: It’s mainly use this for identity generation. You'll level this up to level 7 in order to grab firepower control for 30 meter gain and quickness to reduce your aoe size by 20% while changing your frontal attack to only one quick instance before returning.
- Soul Cutter: You can take firepower control for 30% identity meter gain. Brilliant spear to gain 1 meter and increase your damage by 15% and enhance concussion which will elevate the skill to mid to high stagger level. When attacking a single foe increase your damage by 60%. Pair the “Quick Recharge rune” to this skill.
- Raging Dragon Slash: It is easily your best stagger ability. Max this skill out and apply quick prep for cooldown reduction, additional slash to change to combo mode and provide an additional instance of damage with a 40% damage boost and awaken which creates a dragon along your trajectory that attacks three times for an additional 50% damage and 25% crit rate. Pair this skill with “Rage rune or Wealth rune”.
- Half Moon Slash: Max the skill out and for tripods, take flurry expertise, final decision and blade of tornado which all massively pumped the skills damage. When you take final decision, this ability will consume 20% of your meter to apply the 60% damage bonus. Landing this attack will easily gain you that back but missing it will punish your rotation. Also place the “Conviction rune” on this ability as you follow it up immediately with wheel of blades.
- Wheel of Blades: Hitting level 10 on the skill as well in order to take advantage of magic control for 50% cost reduction. Weak point detection for an extra 30% damage to push immune foes and consecutive spin. Changing the skill to a combo mode and allowing the skill to be used two consecutive times and increasing damage by 100%. This gives us the ability to guarantee the judgment proc, increasing our resource recovery and skill cooldowns.
- Shackling Blue Dragon: This skill is used at the end of our rotation as it deals a massive amount of damage, does weak point and stagger damage and lowers enemy crit resistance by 8% for 6 seconds for you and your entire party. Max the skill out in order to take quick prep for cooldown reduction, blitz to reduce the aoe by 20% but make the attack instantaneous and critical spear, which further reduces enemy crit resistance by 10%. And because our skills on the red stance almost all crit at 100%, this provides the most bang for our buck at the end of the rotation. Also make sure that we're slapping a “Focus rune” on here to reduce the skills mp consumption.
Red Stance Skills:
- Red Dragon's Horn: Max this skill out as far as it can go in order to obtain quick prep for cooldown reduction, spear of destruction to reduce the width to 45 degrees but guarantee a crit, and weak point detection to increase damage to named or higher foes by 60%. Then attach a “Galewind rune” to the skill in order to speed up its casting speed allowing us to chain into our next skill within six seconds of swapping stances.
- Starfall Pounce: It is another skill that deals massive damage. We can bring the skill up to level 10 in order to get weak point detection for a 20% damage increase, quick prep for cooldown reduction and powerful finish which makes your crit rate on the skill always hit at 100%. In order to make sure that we generate enough red meter we put a “Wealth rune” on this skill to guarantee that we have the resources to maintain our pinnacle buff.
- Dragonscale Defense: This is one of the best filler skills to have.
- 4-Headed Dragon: This is another filler skill that has you thrust your spear eight times in front of you for extremely high damage. We leave this skill at level 1 as it does just enough damage without anything else.
- Thrust of Destruction: It is more on the moderate side of damage, it's another skill that we don't really need to level up.
- Spiraling Spear: A solid single instance high damage attack that also provides low weak point damage in a pinch.
Mobbing Skills
- Soul Cutter
- Windsplitter
- Magicka Control
- Final Decision
- Giant Wheel
- Wheel Blades
- Quick Prep
- Valor
- Enhanced Strike
In terms of tackling horde style content, you simply need more aoe. To achieve this, we take soul cutter and replace it with a maxed out wind splitter. We take magicka control, final decision and giant wheel to increase our aoe damage and pull enemies in. Then drop wheel of blades down to only level 4 and instead bring cutting wind up to max level with the following tripods. Quick prep for cooldown reduction, valor for increased damage in aoe and enhanced strike for even more damage.
Awakening Skills
- Spear Meteor
- Stroming Red Dragon
Skill Rotation
- Start with Cutting Wind into soul cutter for some quick initial gauge generation.
- Follow this up with Raging Dragon Slash for a nice chunk of damage.
- Do your conviction judgment combo by chaining Half Moon Slash into wheel of blades. By this point, your identity gauge should be at three bars.
- Before switching, use Shackling Blue Dragon to enable the crit resistance debuff on your red skills.
- Lead with Red Dragon's Horn into Starfall Pounds immediately for extremely high burst damage
- Near instant full gauge generation, finish up with Spiraling Spear. If for any reason that your gauge isn't full by this point whether it be because you aren't in a full end game build yet or something didn't quite land, continue to do red rotations until it is.
- As soon as your red gauge is full, immediately swap back to blue and repeat.
Stat Priority & Gear
- Primary Stat: Specialization
- Secondary Stat: Swiftness
- Secondary Stat: Crit
Get as much specialization as possible as it increases the effectiveness of the identity gauge buff when switching stances. From here, you then have two choices for your secondary stat on your necklace, you either go swiftness or crit.
Engravings
- Pinnacle
- Keen Blunt Weapon
- Grudge
- Cursed Doll
-Increases Mass
Glaivier Build Gems
Cooldown gems:
- Half Moon Slash
-Raging Dragon Slash
- Red Dragon’s Horn
- Shackling Blue Dragon
- Cutting Wind
Attack gems:
- Half Moon Slash
- Raging Dragon Slash
- Wheel of Blades
- Starfall Pounce
- Red Dragon’s Horn
- Soul Cutter

Game Giveaways

Lost Ark Related News
-
 Lost Ark Event Guardian Raid Guide 2023 - Raid Rotations, Rewards, Tips & Make Gold5/19/2023 11:41:43 AM
 -
 Lost Ark Hanumatan Guardian Raid Guide: Release Date, Ilvl, Rewards, Mechanics & Tips3/23/2023 11:59:14 AM