 Google Safe
 EN
EN
 FR
FR DE
DE NL
NL ES
ES IT
IT PT
PT Game Giveaways
 D2R Boss Drops

Lost Ark Argos Phase 1-3 Mechanics Guide: Basic Attack Pattern, Safespot & How To Do Phase 1-3 Of Argos
4/14/2022 9:07:33 AM
Since the March update last month, Lost Ark Argos was released as the new Abyss Raid boss, who is the beginning of end-game bosses that possess an extensive list of mechanics. So today, we present a Lost Ark phase 1-3 mechanics guide, detailing how to do phase 1-3 of Argos in Lost Ark.
Lost Ark Argos Phase 1-3 Mechanics Guide - How To Do Phase 1-3 Of Argos
Lost Ark Argos Phase 1 Mechanics: How To Do Phase 1 Of Argos
Basic Attack Pattern
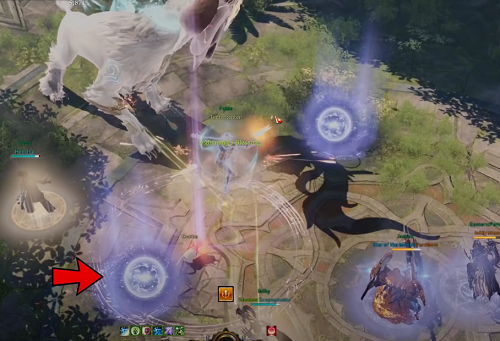
At the beginning of the fight, your party will be assigned either a moon or a sun affix. If you're a moon, there will be a purple circle under you, if you're a sun there'll be a yellow circle under you. It is very important that you keep track of this throughout the entire fight as all the major attack sls mechanics will involve either sun or moon mechanics.
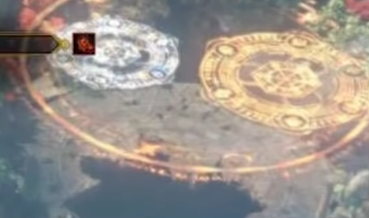
For example, let's look at this giant aoe attack that is purple-colored. It does mean that this is a moon attack and party member with the moon affixed onto them can safely stand in a circle without taking damage and continuously DPS. However, if you're a sun, then you must walk away from the circle. This also applies to the rest of the attack, however, a noticeable one is this double ring circle. He'll attack both of the inside and the outside area and simply head to the one corresponding to your colors, so if you're a moon, you head outside in this case. However, every time he does this he'll switch the color around. So because the moon is the outside circle right now, the next time that he does it, it'll be an inside circle.

The next time he does the same attack, the color is flipped where the moon is inside circle. Sometimes, the boss likes to spawn these ball and the party member with the corresponding affix or color must consume these ball because otherwise, they will explode. You cannot collect two ball at once, so each party members should try to collect one ball. For pizza attack, just go to your colors, he'll do this about 2 to 3 times, so just make sure you move quick.
Finally, he will summon a giant ring. And if you are the opposite color of the ring, then you have a meter above your head. Make sure to not let this meter run out because otherwise you will take a lot of damage and most likely die. Exiting the ring is enough to remove the meter and then you can go back in. Not every single attack is associated with a office or a colors, the boss do also do regular attack on top as well. Whenever you stagger the boss, make sure to also watch what color the boss is currently glowing, in this case it is yellow which means he'll immediately follow with a close-up attack as soon as he's got up. On the other hand, if the boss is glowing purple, then just simply stack on the boss because he will follow up with a ranged attack after you get up.
Safespot
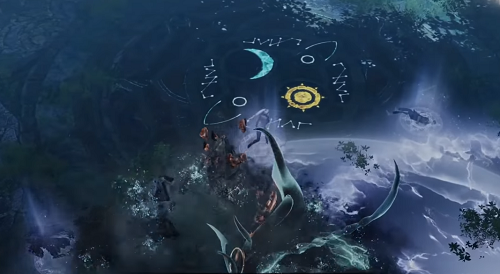
He will create 8 safe zones, two in each cardinal direction with one being a moon and one being a sun in each direction. Like always, just assign your party member with a corresponding spot and you're good to go. After this, the boss will create a dial right under him and at this point, your entire party should stop attacking and simply wait for the dial to run out. This is a cheese way of doing it, the proper way of doing it involves you balancing your sun and moon attack which is more difficult. So most people would just cheese this attack by stop attacking it. After this mechanics is over, the effects it's signed to your party will change. If you're previously a moon, you now be a sun and vice versa, so it is important to keep track of what attack is corresponding to your element.
Memory
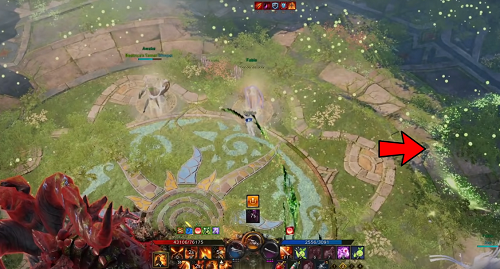
The boss will do a series of telegraphic say slot which you must then memorize and head to. However, there is actually a way to cheese this mechanic. A sun safe spot will always appear at this spot currently on the screen as well as the location directly opposite of it. While the moon saysot will always appear at the bottom right as well as the opposite location at the top left. So what you could do is just ignore everything about the memory and head to these spot because they will appear at the end of the sequence and will always be the hardest hitting attack. This more or less completely cheese the mechanics and then you can continue as normal, this concludes most of the major attack sos mechanics for phase 1 of Argos.
Lost Ark Argos Phase 2 Mechanics: How To Do Phase 2 Of Argos
Basic Attack Pattern
Party composition in phase 2 of Argos: sun party, moon party
The party 1 will be the sun party and the party 2 will be the moon party. This affects does not change over the duration of the fight. Additionally, party 1 which is a sun party will require heavy destruction so you should bring destruction bomb on every single one of your party member, while party 2 will require high damage as well as staggers. So you should be putting classes berserker or sorcerer into your second moon party or just put high gear score people in general. Shortly after the fight start your party will be split and your sun party will head to the sky garden to fight the mini boss while the moon party will continue fighting Argos.
Argo himself will have very similar attack pattern as the one they have previously seen in phase 1.
For example, here is the pizza pattern that you have previously seen from phase 1, but you also have additional pattern that you might have not seen before like the rock pattern that you can dodge just by running in a straight line or he could amplify previously scene pattern like the two line pattern, but with a much bigger range instead.
Sun Mini Boss
He has a relatively simple pattern. Here is a really long wind up tail swipe, the main thing to watch out for are the green things that he spawns either on the ground or drop from the sky as these things will not only do damage to you but will also stun you if you get hit by two of them. But the most important thing to note here is that whenever you knock the boss down, a weak spot will be exposed and you want to destroy this weak spot as fast as possible. The amount of time that you have to do this is very low, so this is why you have to all bring destruction bomb and all frodo. If you fail to destroy the weak spot, the boss will enrage which makes its attack much more deadly.
Laser Signal
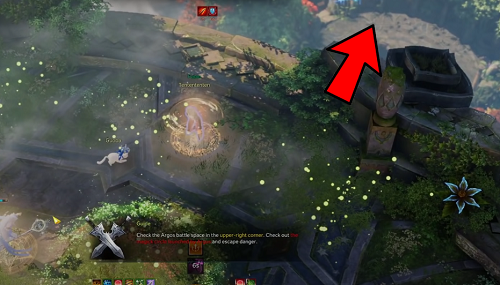
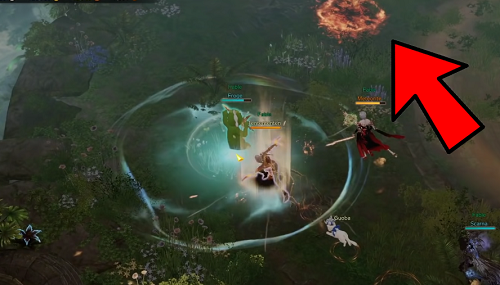
Argos will sit down and fire a laser into the sky indicating that the mechanics has begun. Argos will then later create a dial under himself which serves as a timer for the current mechanics. Keep track of this timer as it will be important for the mechanics. At the same time as the laser got fired, one of your party members from the sun room must then run to the top right of the arena and look down at the bottom arena. There will be a pattern that you can observe that tell you what to do in the upcoming mechanics and there is a total of 6 different patterns that denote different things.
Starting off with the top three, these to know that the moon party which is the party fighting Argos outside must stand at a certain position when the dial under him is fully finished. The moon party needs to stand at the top right of the arena when the dial under Argos is fully finished avoiding the one shot attack.
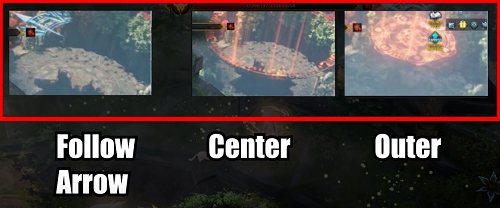
This pattern has a similar concept, however, instead of the moon party, the sun party need to stand in the center of the arena when the dial under Argos fully finishes.
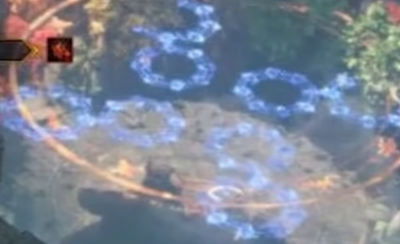
In the current pattern, orb will spawn around Argos and you must collect all of them before the timer ran out very straightforward.
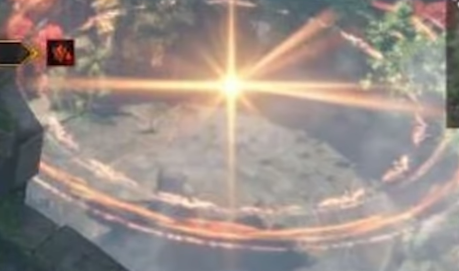
In the final pattern, the sun will spawn across the four corners of the map, you must stand in this sun and wait for it to turn purple and then this will give you a buff which you can attack Argos with and it will transfer the buff onto Argos. Do this until the dial under the boss turn into a moon and then you're good. Do these patterns until you are able to defeat the mini boss into the sun room which concludes the first half of the fight, you will then be transported back to the main area to join with the rest of your team and face with Argos once again before starting off with the second half of the fight.
Moon Mini Boss
Shortly after coming back, the moon party will then be transported to fight another mini boss which begin the second half of the battle. The first thing you'll notice is that you're dramatically slow. However, the most important thing to get started is that you should try to burst the boss down as fast as possible using stuff like dark bomb or awakening. You want to burst the boss to 70% within a minute 30 seconds, so that he does not do the white mechanics but just in case you couldn't. Then the sun party will have to destroy totems that are scattered across the map, they will be displayed on your mini map and destroying these will not only remove the movement speed debuff on the moon party, but will also prevent the white mechanics. It is a lot easier if you just try to burst the balls down which is why party 2 or the moon party will require high burst damage causes berserker or sorcerer.
How to do the moon mini boss
If you see the red pillar, then four safe spots are spawning across the arena. One of each must be taken by each party member or otherwise, a high damage shockwave will be dealt to your entire party. He might also put some totem down which just sent a straight line shockwave, this is not a mechanics, it's just a really simple attack. So you don't have to worry that it is a major mechanics.
Into the second phase of the moon mini boss, the moon mini-boss will disappear and hide under the ground while a mini mini boss will take the place instead. This mini mini boss does not take a lot of damage, however can be staggered. When you fully deplete the stagger bar, he will take much more damage. Once you have staggered the mini mini boss, he'll dive very quickly and the main mini boss will reappear. This is your opportunity to heavily burst the boss down because he'll be on the floor laying dead, so he can do a lot of damage. Once he has passed the threshold of 30%, he will go into hiding once again and summon the mini mini boss. Once the moon party have successfully defeated the moon mini boss, you'll then all be transported back to the main arena to have a final showdown with Argos once again.
Lost Ark Argos Phase 3 Mechanics: How To Do Phase 3 Of Argos
There will be no more effects mechanics, there's no more sun party, there's no more moon party, you're responsible for dodging every single attack. Fortunately, his attack pattern is extremely similar to the one you have seen in the previous two phases, but there will be one new major attack that you should also watch out for. Argos will disappear and then a bunch of Argos will charge all over the map. The easiest way to avoid this attack is simply run toward the edges of the arena which make this attack much easier to avoid.
Weather and Seed
Argos will always start the fight with a clear sky aka during the day. However, throughout the fight, he can transition to either raining or nighttime. You'll also be able to observe seed during the entire fight and depending on the weather you'll want to collect different scenes. The way you collect seed is very simple, simply step on them for a few seconds.
Day Mech
During daytime, collecting green seed will remove the slow debuff that is currently on you, while collecting red seed will create a large aoe explosion in the area. So you should collect green and avoid red or you can just avoid every single seed altogether. Additionally, Argos will have unique white mechanics for every single weather. During the day, there will be a yellow seat that spawn and every party member must gather around the yellow seat in order to avoid the wipe. if one person failed to do so, it would cause the entire raid wipe.
Rain Mech
The rain will continuously do damage to you, so the way you can protect yourself is to step on and collect the buff provided by the blue seat. Be careful to not step on the green seat, however as these will imprison you and then be troublesome for your fight. Likewise, there will be a white mechanic during the rainy weather. However, this one is much more simple, simply go to any of the blue seat that is currently visible and will create a protective barrier that will protect multiple people.
Night Mech
During the night time, your vision will be greatly reduced which make it hard to avoid an attack. You can regain your vision by stepping on a red seat which will give you a buff that will regain your vision. Multiple people can get the buff at the same time, so make sure to ping to your teammate that you will be collecting this seat so that they can join you and collect the buff as well. If you have yet guessed it, the blue sea drink knife face is bad and will poison you which will do a large amount of damage over time. Fortunately, you'll be able to cleanse it off using panacea.
For the white mechanics during the night face, multiple purple seats will spawn all over the arena and you must collect every single one of the seat before Argos delete you. The location of the seat will be displayed on your mini map, so make sure to grab those.
Safe Spot
There is a final mechanics that he can do at any given moment across the three phases. Two of your party members will have sun symbol above their head, a few seconds later a safe zone will be created under each player with a symbol. So you will have to gather up and fit inside the song but the trick here is that each song only fit exactly 4 people. If you don't get in, you die. If you remember about this attack where he'd rate his body and then either attack the inside or the outside area, he'll always attack inside first which means outside is safe and then he'll attack outside which means inside is safe. However, the important thing is that when he change weather or faces, he will reset the pattern and it will always attack inside first on the next attack. So make sure to adjust properly and don't get debated whenever he does the attack, but he switches faces. You can actually argue that phase 3 Argo is easier than phase 2 because you can just avoid every single seat and completely ignore the seat mechanics.

Game Giveaways

Lost Ark Related News
-
 Lost Ark Event Guardian Raid Guide 2023 - Raid Rotations, Rewards, Tips & Make Gold5/19/2023 11:41:43 AM
 -
 Lost Ark Hanumatan Guardian Raid Guide: Release Date, Ilvl, Rewards, Mechanics & Tips3/23/2023 11:59:14 AM