 Google Safe
 EN
EN
 FR
FR DE
DE NL
NL ES
ES IT
IT PT
PT Game Giveaways
 D2R Boss Drops

Elden Ring New Exploit Guide: How to Get Smithing Stone Bells
8/1/2022 4:06:55 PM
In this guide, we go over a new exploit on Elden Ring! Level Up Fast! No AFK! This is the best Elden Ring rune farming glitch after Patch 1.05. In this guide, we'll show you how to get unlimited Smithing Stones as well as the first second, and third Smithing Stone Bell, so this way you can grab as many as you want.
#1 Smithing Stone Bells – Ash of War: Ground Slam
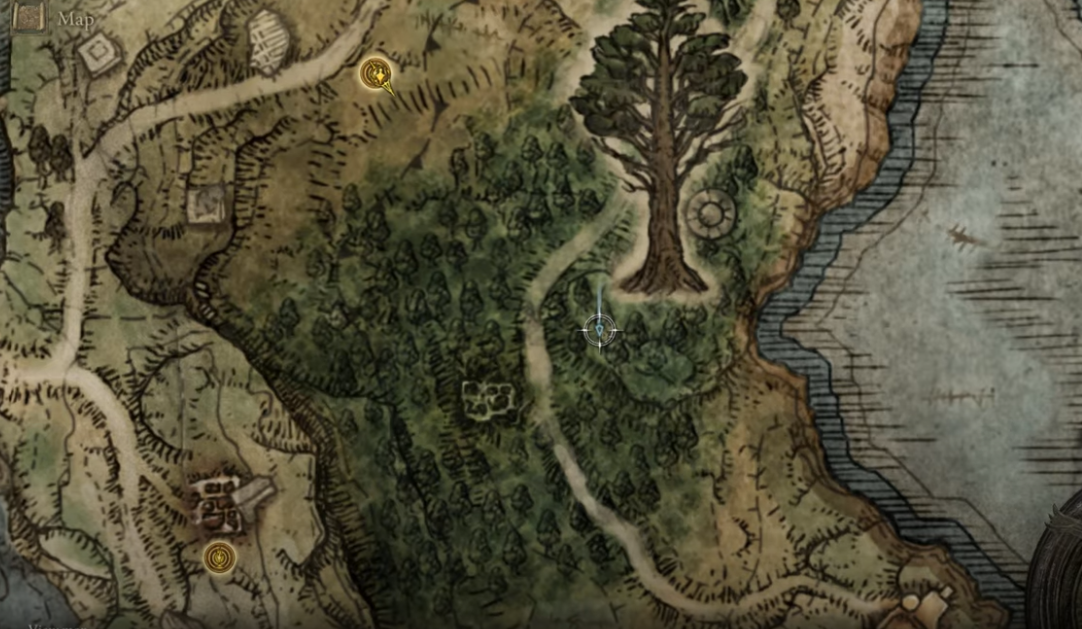
We first want to arrive at the Mistwood Outskirts' lost Grace, and then travel to where I just marked on the map which you are going to find is a Scarab, when you do defeat this carob, you will receive the butt stomp, we're pretty sure that's not the ash of War name, that's what we are going to be doing, we are going to be using this Cheese slash, in order to take out one of the bosses early, so here we go we have the Ground Slam.
Adding Skills
With a Whetstone Knife, you can use ashes of war to grant your armaments new skills at sites of grace.
An armament can only have one skill. Any skill it previously had will he moved.
An armament's type determines what skills it can have. Some special armaments have unique skills and cannot be granted new ones.
Adding Affinities
With a Whetstone Knife, you can use ashes of war to grant affinities to your armaments at sites of grace.
This way, you can alter an armament's attack affinity, boost attribute scaling, and more.
An armament's type determines what affinities it can have.
Some special armaments, like those with unique skills, cannot be granted new affinities.
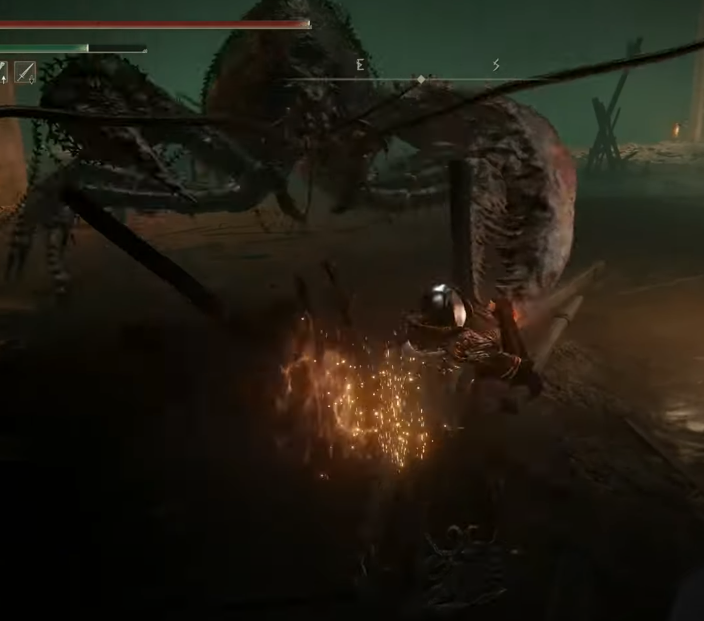
So let's then arrive at a specific tunnel, so where do we need to head to, Let's head over to the lake which you can get here early game, so we are right here at the Crystal tunnel, you'll want to proceed forward towards the east, then you'll enter into the tunnel, you'll take each elevator until you reach the third elevator down, and you'll go to the yellow door or the yellow mist, and you'll then encounter the crystalline, what we want to do is butt stomp, this specific boss until it is then defeated like so, so let's get into it, when you do use the butt stomp, what you're going to notice is that the health is going to be dramatically reduced, and for the third time if you continue this up, you will then defeat the boss, and you will receive your first smithing Bell.
#2 Smithing Stone Bells - Miner's Bell Bearing [1]
Let's get into the second smithing Stone Bell, what you need to do is arrive right here at this lost Grace called Fort Haight West, you'll then arrive towards the front of the castle, you'll then go inside, take a left, and then take the stairs up, as you do take the stairs up, you'll want to instantly go towards the ladder which is located right there on the right side, the reason why you want to rush this is that there are enemies that will take you about instantly if you do not do it so, so then once you reach the top, you'll open up the chest, and from there you will have your Medallion, now that we have picked up the left Medallion, let's go ahead and pick up the right one which is right here at Fort Faroth, once you are here go inside, take the left ladder, go up, and you can pick The Medallion right away, it's easy to grab.
Once you've done, so we can then proceed over to the Temple Quarter, because we are going to then go forward and pick up a Glenstone key which is north, you will notice the dragon right there in the background, we are going to go around by Jumping On Top of the Rock here, you could simply just walk around him as well, but hey might as well do it this way, I guess just make it fast, then hop back on your torque and get the heck out of there, once you've done that, you can then arrive at this specific gloss Grace right here at the Laskyar Ruins and we are going to then proceed forward and take the teleporter which will then take us directly up to the top of the academy, now when you do take this teleporter, you will notice or actually when you are in the act of taking the teleporter, there will be some enemies that can take you out so watch out for them, when you do take the teleporter through, you can then proceed towards the silt door, so use your Glintstone key from Liurnia of the Lakes, go to the next room, and then use the Glintstone key on the silt door, when you reach the next area - Bellum Highway, you can then go towards the Northeast, and you will notice that we are going to be arriving at the Grand lift, when you are at the lift, use your medallions right there and you will then host the medallions up.
So hoist them up and we are going to proceed on this area right here which is the Altus, you're going to then proceed forward on the stone path, follow the stone path all the way up until you reach a set of stair steps, when you do this, you're going to notice that there is a boss which well specifically two bosses that are going to try to take you out, watch out for them, because at a low level that will be a major pain, we're going to be going past the Capital Outskirts here, and we're going to drop down into this lake, as you do reach the lake, you will eventually reach Eternal slash cave, and this pretty much is the easiest Bell to pick up, because all you have to do is find the chest which is located on the right side, make sure that you take out the silt tunnel, literally there's a sill tunnel with magic, just strike it once and then go to the right side here towards the west and pick up your second Bell.
#3 Smithing Stone Bells – Miner's Bell Bearing [3]
Let's head over to the third Bell what we need to do is head over at The First Step lost Grace, and then we want to locate a tunnel which is directly down below, if you are wondering why I have all these lost Graces unlocked, the reason for this is so that it's easier for you to view and see exactly where we are going on the map, so what we want to do is once you've reached the tower and you've used the chest, we're going to use our memory of Grace and favorite the castle Ward tunnel map, now use your memory of Grace then click your favorites and choose the castle Ward tunnel, you should teleport right at the door instead of at the Lost Grace, just leave join back and you will arrive here go forward and you will eventually reach this area, you can hop all the way down on each building structure until you reach the main floor, then you can open up this door located towards the east, we are going to then go all the way around so that we can then reach the elevator which will take us up, you will reach the golden door a majority of you should know this next step, we are going to use our Crucible horns, we are going to use the dragon breath right afterward, and this is going to slide you forward, if you do it correctly you will arrive, if you do it correctly you will land on the fence like so and then you can jump onto the next portion, if you jump right here we are going to use a buff spring glitch so use your Mount and then jump forward, you're not going to use your mount for real but it's going to help you launch a little bit further, let's say that you do miss the third one can you get to the other step by doing this, you can reach the next part just by doing this, so it's okay if you do miss it try that out and then walk slowly around the building, you will reach this side of the building where you can run against it and then jump over the wall slash fence you will arrive at the Capital Outskirts, we are going to then proceed forward towards the lift, and do the same glitch that we just did by using the memory of Grace, and then fast traveling to our favorite lost Grace, once you do so you will arrive right here at the top, go forward till you arrive at some more ruins, lost Grace, then go to the actual ruins which are right there on the map, you will locate a downstairs location which you can go down and then you'll pick up your third Smith and Bell.

Game Giveaways

Elden Ring Related News
-
 Elden Ring Colosseum Locations - How to Get Into All PVP Arenas After Colosseum Update12/7/2022 10:58:58 AM