 Google Safe
 EN
EN
 FR
FR DE
DE NL
NL ES
ES IT
IT PT
PT Game Giveaways
 D2R Boss Drops

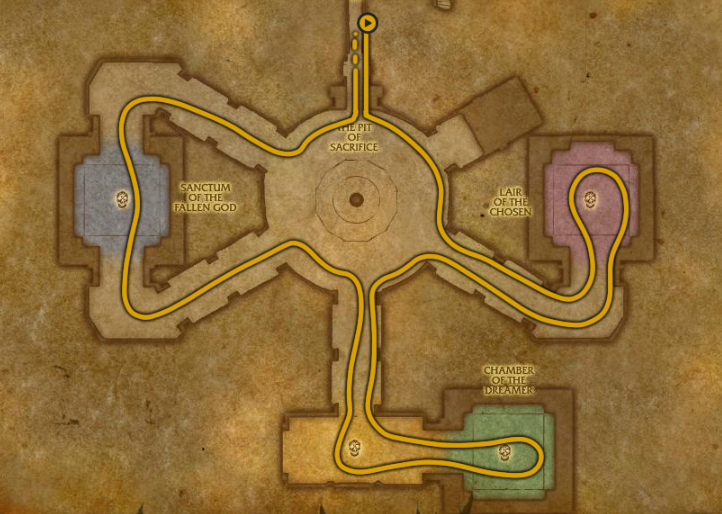
How to Raid BFD in WoW Season of Disvovery - Raid BFD Step By Step Guide
2023/12/29 15:08:04
What should you Bring to the raid? we have a step-by-step guide to raiding BFD, if you're new to raiding BFD struggling or just want to perfect your clearing in WoW Season of Discovery!
Best BFD-Specific Consumables
These are a list of the most useful BFD-specific Consumables, there are still others that are good but they won't make or break the raid whereas these can:
-Blackfathom Sharpening Stone
-Blackfathom Mana Oil
-Free Action Potion
-Shadow Protection Potion
-Elixir of Water Breathing
-Heavy Crocolisk Stew
-Rumsey Rum Dark
Baron Aquanis
-You will have to spawn 3 of these elementals by clicking on the Stones with Runes on them Before aquanis.
-Depth charge happens Every so often and will choose 1 person to knock up and everyone near them. So That person must jump in the water to avoid sending everyone off the platform.
-Care Underwater in this section you get this debuff (next to this).
This makes you lose breath 75% faster and there will be whirlpools that knock you to the bottom of the water and stun you for a second, Also the bubbles will give you MS if you go through them.
Ghamoo-RA
-Aqua shell = You will Deal Reduced damage while it's up until it has been completely broken to 0%.
-Pull the boss when he walks onto this patch of land connecting the entrance to the middle to avoid pulling any extra adds.
-Crunch armor removes 25% of armor per stack so tanks should be aggro swapping at 2-3 stacks maximum.
-While Aqua Shell is on it will spawn these bubbles that will deal DMG and knock you up so it is key to avoid them, if you think you are close to one just back up and reposition it is NOT worth taking a hit from one, you could be bouncing until you are completely dead.
-When Aqua Shell reaches zero it will explode all melee DPS or tanks especially make sure you back 20 yards to not get knocked back it could send you bouncing through bubbles to your death.
Lady Sarevess
-This is the only Mechanic in the entire fight and all you need to understand, when you see her casting “Freezing Arrow” she will then turn the ground below her “frozen” and it will become white if you stand in the white stuff for too long you will completely freeze becoming stunned and unable to move for 10 seconds.
-So what will always be easiest when you pull the boss, have your off-tank/best single target threat generator pull the elite ADD and have them drag it away from the fight until Sarevess casts freezing arrow then drag the ADD and only the ADD, hold it on the white ground to Freeze it for 10 seconds.
-Gelihast has to be killed 3 times, the first two times you get him to roughly 2.5k HP he will become invulnerable and regenerate health till he is full, also casting “March Of The Murlocs” When this is cast there will be shadow murlocs that will spawn all over the room swarming it and walking in a straight line without turning, you must avoid them otherwise you will take a Large amount of burst damage from them. There will also be circles that appear on the ground avoid those as well, but you do have a moment when they appear as their DMG is very Delayed.
-This little indent on the back of the room near the entrance is what wehave found to be the easiest to dodge everything at you can just slide from the left to the right depending on where murlocs/shadow crashes are coming.
Lorgus Jett
-Before you actually reach the boss you have to get through this “gauntlet”, it will start with one Priestess and One Elite add and after a short time, 2 murlocs will spawn, when you eliminate the priestess you move on to the next part of the gauntlet (it will continue to spawn murlocs every short while) after the third priestess you will have the boss start approaching you automatically its important your Single Target Threat Generator Takes aggro this fight the entire time.
-Lorgus Spawn’s 3 different totems during this fight “Windfury Totem” causes Lorgus to attack multiple times per swing. “ Molten Fury “ just spawns a lava ball that will follow the closest person to it and explode knocking them up whoever is tanking the boss walk it away from the totem slowly, “Lightning Shield totem” Puts a thorns effect on him that will deal 200 DMG per hit from any one individual, IT IS IMPERITIVE that when a totem spawns ALL DMG switches to the totem and kills it, wehear some grps only have everyone switch when its the lightning totem but we find it just cleaner if everyone just turns and kills the totems immediately no matter which. IT IS EVEN MORE important that everyone STOPS hitting boss when the lightning totem spawns I would even stop hitting just before!
-So in Phase 1 he will sleep the 2 closest people to him so its IMPERITIVE you start the raid with your off tank waiting they DO NOT engage the boss until the first sleep goes off (cause 99.99% of the time it will be your MAIN TANK that goes down if both go down just get ready to wipe, you want one of your strongest melee dps to be as close as possible to kelris so when they go down they can help get out the fastest).
-So for his first phase This will be the most important move to watch for and you genuinely need to setup a order of interrupts so that way no matter whos in the sleep realm you can always interrupt the shadowy chains (I ALSO HEAVILY recommend getting the addon DBM as it will show like it does in the image above when to interrupt it) so preferably you have a rogue kick #1 then pala rebuke #2 and #3 but you can slide any interrupts in there place that is just the best setup we've experienced so far for kelris. Then mind blast in phase 1 its single target so its nice if your #3 in the order uses his interrupts on the mind cleave so your tank takes less DPS during this phase.
-The purple gas is fairly easy to deal with, away from anyone else fighting him and you just leave the gas immediately and regroup with the other ranged.
-So if you’re Lacking two paladins or for some other reason are in need to cleanse during this boss you will try to have it to where when 2 people get 4stacks (preferably the main tank and offtank cause they are the only ones who SHOULD be getting and DOTS on them,unless you have two DPS ret paladins tanking then only they should be) they both walk into the same cleansing pool and cleanse at the same time, because when you cleanse it spawns adds and turns the cleansing pool into a pool of the same DOT debuff that akumai is applying at that time,so after cleansing immediately get away from the cleansing pool and wait for the adds to step out then focus the adds before returning onto the boss to ensure nobody accidentally goes down and to reduce chaos in the raid.

Game Giveaways

WOW Related News