 Google Safe
 EN
EN
 FR
FR DE
DE NL
NL ES
ES IT
IT PT
PT Game Giveaways
 D2R Boss Drops

FIFA 22 Formation 41212 Guide - Best 41212(2) Custom Tactics, Player Instructions & Play Tips
10/8/2021 3:08:05 PM
How to play 41212 formations effectively in FIFA 22? In this guide, we are breaking down the best custom tactics and player instructions of the very popular FUT formation, as well as presenting some tips to help you play the most meta 41212 squads!
FIFA 22 META Formation 4-1-2-1-2 Best Tactics, Instructions & Tips
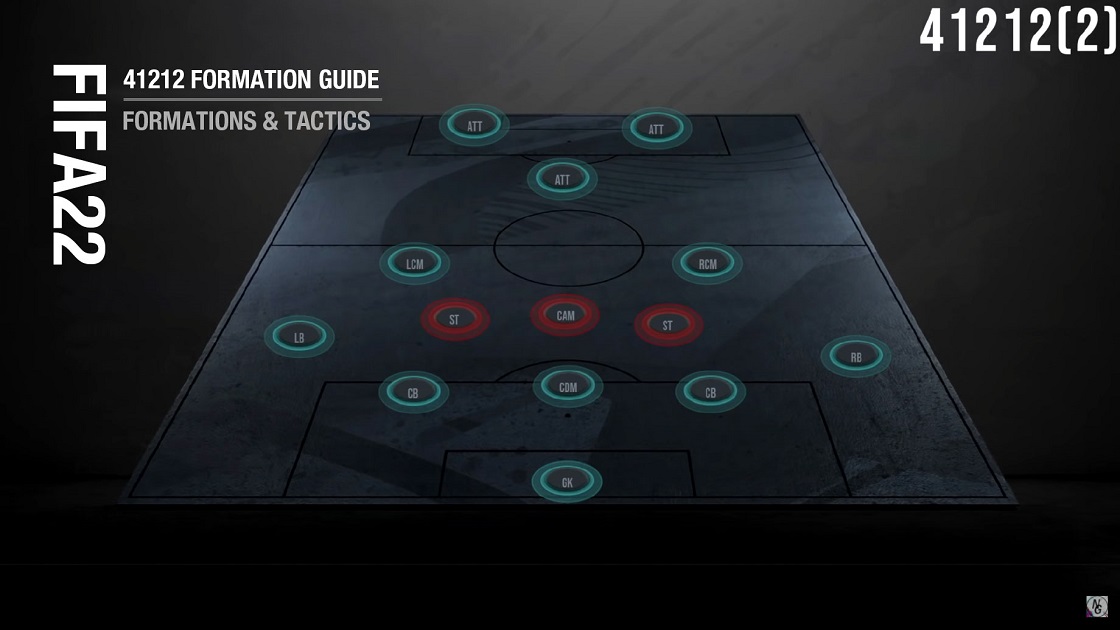
The diamond shape formation - 41212 is one of the most popular formations in Ultimate Team, which has the CAM as the key element and the 41212(2) has been the Meta Tiki-Taka formation to give you more wins in FIFA 21 Ultimate Team since the improved passing make the formation more dangerous offensively than ever.
41212(2) also know as the 41212 Narrow is a devastating attacking formation with three strikers, where you've got two strikers on state forward and a CAM just behind that can be easily used to set up counter attacks to devastate your opponent, create overloads, and almost create a 3v2 situation against your opponents back to center backs, which means you'll always find a way through, especially now to use player lock and creative runs.
FIFA 22 Best Meta 41212(2) Custom Tactics
There are two options for custom tactics to build meta 41212(2) formation:
41212 Best Custom Tactic Option 1 (Drop Back)
Defensive Tactics
Defensive Style: Drop Back
Width: 5 Bar
Depth: 7 Bar
Offensive Tactics
Offensive Style: Balanced
Width: 5 Bar
Players In Box: 5 Bars
Corners: 2 Bar
Free Kicks: 2 Bar
41212 Best Custom Tactics Option 2 (Balanced)
Defensive Tactics
Defensive Style: Balanced
Width: 6 Bar
Depth: 4 Bar
Offensive Tactics
Offensive Style: Long Ball
Width: 7 Bar
Players In Box: 5 Bar
Corners: 1 Bar
Free Kicks: 1 Bar
More Tips For The Best 41212(2) Custom Tactics
1. Use drop back system with 7 depth, you're high up the pitch, but this way you won't get counter so easy because you're playing so attacking, you need an anti-counter measure, if you've got players on the straight forward you can use this system.
2. The balanced one allows you to press easy and be higher up the pitch when you are defending, now the width of the balanced system cannot be five or four with 41212(2) formation is very narrow, you only have these players on the wing if your opponent's got a laminar ram you can easily get doubled up and you could get screwed.
3. What people are doing is they're getting a player to lock feature and they're making a player lock run down the wing and playing three walls to these players, so the way to counter that is you need a width of six and do not go below six widths for 41212(2).
4. Fast build-up play especially with drop-back, if you're using it the players run forward too quickly, you got no one left in the midfield. With balance, you've got an appropriate combination between players going forward but no one really makes this darting runs forward of course AI has improved, but the long ball gives you that and sends players to the left and the mid-right cinematic.
FIFA 22 Best Meta 41212(2) Player Instructions
Here list the best instructions for each position you should have a try for 41212 formations in FIFA 22:
Centre Back (CB)
Attacking Support - Stay Back While Attacking
Interceptions - Normal Interceptions
Left/Right Full Back (LB/RB)
Attacking Support - Stay Back While Attacking
Interceptions - Normal Interceptions
Run Type - Mixed Attack
Defensive Mid. (CDM)
Defensive Behaviour - Cut Passing Lanes
Attacking Support - Drop Between Defenders
Interceptions - Normal Interceptions
Defensive Position - Cover Center
Right/Left Attacking Mid. (CM)
Attacking Support - Balanced Attack
Support On Crosses - Balanced Crossing Runs
Interceptions - Normal Interceptions
Positioning Freedom - Stick To Position
Defensive Position - Cover Wing
Center Attacking Mid. (CAM)
Defensive Support - Stay Forward
Support On Crosses - Balanced Crossing Runs
Positioning Freedom - Stick To Position
Interceptions - Normal Interceptions
Striker (ST)
Support Runs - Stay Central
Attacking Runs - Mixed Attack
Interceptions - Normal Interceptions
Defensive Support - Stay Forwards
More Tips For 41212(2) Player Instructions
ST - When you're attacking, you've got three strikers on Stay Forward, so even though your width is very high, 3 strikers are going to stay like in the triangle when you're attacking. The left, middle and right-center midforwards are going to be a bit wider, which means when you're attacking, they're not going to be directly behind but they're going to be just behind us when you do have the attack opportunity you do quit those overriding runs. We haven't got getting behind on the strikers though because there's no need and long ball is a tactic getting behind anyway.
CAM - Low driven crosses are the Meta this year when you get the ball down the wing, you want to use a cross inside the box, so you want your CAM to Get Into The Box For Cross to create again the 3v2 situation up against your opponent's CDM's and his backline. Do not use free roam though, make sure your CAM is on balance so he stays in that position.
CDM - Put Drop Between Defenders for CDM so that means when you're attacking will just drop inside, this is how you create the anti-counter tech measure because you're going to have three players at the back. So if your opponent got a 41212, he won't numerically have an advantage against your defense force. Your midfield will be a bit scarce when you're building up so what we've done is we left two of the center mids on balance. Cut Passing Lane is extremely important, people are now positioning themselves to do driven through balls down the wing, you need your CDM drop between the defender and get the situation to the temporary center back to be able to cut the passing lanes, so he will basically drift just in front of the two center backs and basically cutting out the quick one-two passes.
LM/RM - Both the left-center mid and right-center mid, we have left them both on balance again, because we want them to be neutral, but don't want to cover the center and go forward. You can put a winger here and a traditional center mid that gives good variation. If you are struggling with defense though, you can go for example for the most defensive player, but stay back while attacking. If you want to devastate your opponents, you need to be as tacky as possible but also be fluid, so left them both on balance. But the most important thing is leaving the Defensive Position on Cover Wing.
LB/CB - For the left-back and the right-back, left them on Stay Back While Attacking. If you want to make this, even more, attacking you can leave this on balance. But in-game you can always trigger these players to make runs going forward using the D pattern, so if you activate the d-pad tactic attacking four backs, it's very easy going to create an overload down the wing and going forward, so you have to worry about you leaving these backs on balanced.
How To Play 41212 Formation in FIFA 22 Effectively?
Below we give your more extra tips on playing the 41212(2) formation in FIFA 22 Ultimate Team:
1. Defensive with Counter Attacks
Attacking of this formation is magnificent, while you may struggle with the defending as counterattacks are the biggest issue this year (you're attacking your opponent against the ball and he counters you). But do not worry, devise an anti-counter-attack system, so if you're struggling with counterattacks or decides to use a utility player - a CM that drops in between the defenders.
When you're getting counter-attacked, you want stability at the back, most players are using two strikers on stay forward which is basically two center backs first two strikers, so the way to count track that's having a CB or a CDM on drop between the fence which is splitting your center back, so you've got three center backs and you provide a numerical advantage. So even if your opponent has a 41212(2), you're always going to have a numerical advantage with your left back and right back, so that way you can't do your opponent on the quick one-two around you're a cheeky L1 trigger because you're going to have three players at the back as opposed to two.
CDM is going to act as a utility player when he does win the ball back, he can easily build the ball up now. This is going to be a fun fluid fast attacking formation.
2. Fast Strikers & Center Forwards
It is also helpful that you rely on fast players, especially in storms and in the CAM position (preferably with a good shot strength), so that the switching game takes place faster. The rest of the team can concentrate on the defensive tasks.

Game Giveaways