 Google Safe
 EN
EN
 FR
FR DE
DE NL
NL ES
ES IT
IT PT
PT Game Giveaways
 D2R Boss Drops

FIFA 23 Best 433(2/3/4) Custom Tactics & Instructions - How To Play 4-3-3 Formation To Win FUT 23 Champions?
10/8/2022 9:20:29 AM
Set up the best custom tactics and instructions for the 433 formations to fit the meta in FIFA 23, it's time to start dominating your opponents with the 433(2/3/4) lineup in FIFA 23 Ultimate Team.
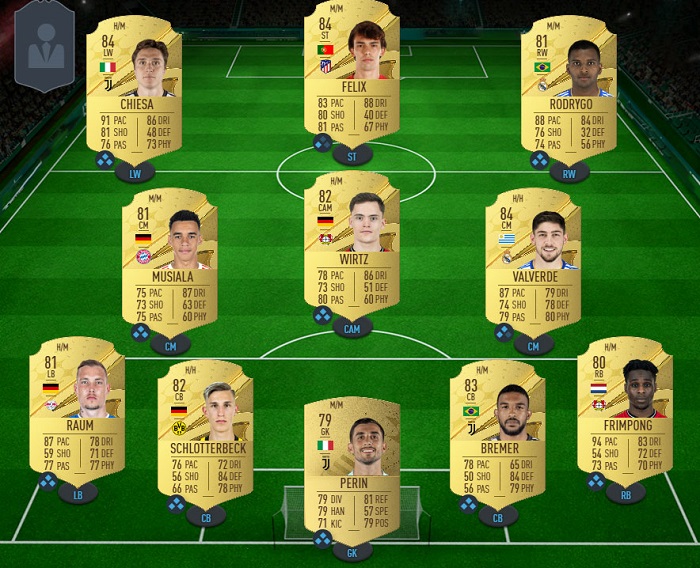
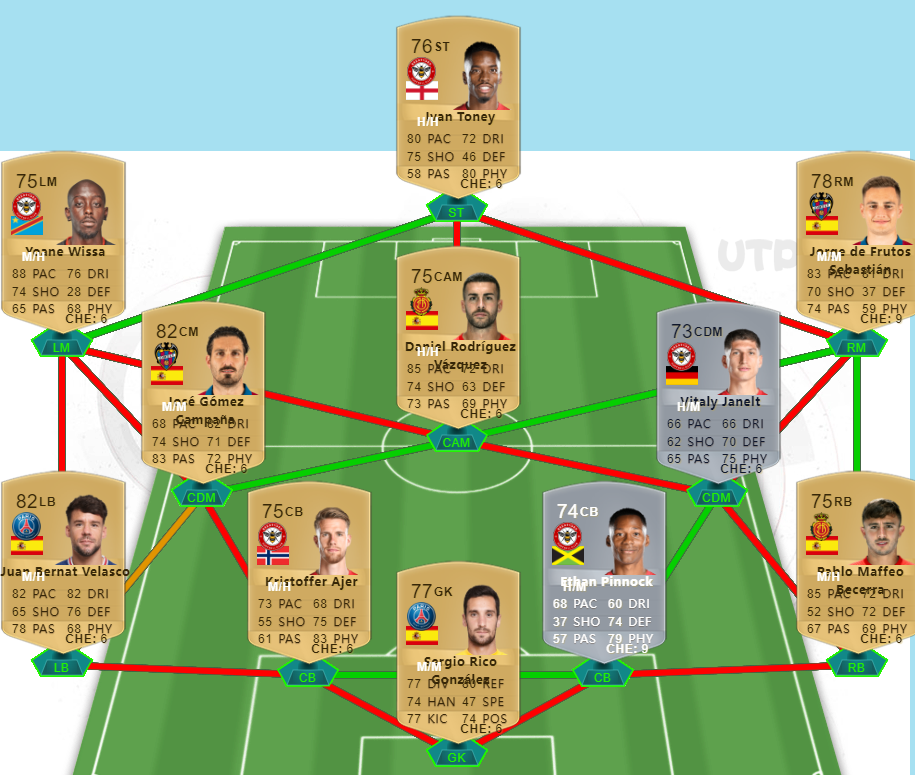
FIFA 23 4-3-3 Formation Features & Gameplay Tips
At the start of every single FIFA everyone including Pro players and content creators automatically go to the formations they're comfortable with, normally you'll see a lot of 423s and a lot of 442s, while we're about getting ahead of the curve and the meta and we're going to be tearing those formations apart by using the current game as it stands to the advantage, so this 433 variations are perfect to start the game with. Whether you prefer old-fashioned Wing play or tick attacker between your central players, this 433 formation will give you plenty of attacking opportunities. Having your Wingers set to get in the box across, means that in the final third there will be a lot closer together to give you more passing opportunities in and around the penalty area. Meanwhile in the build-up play transition that statewide instruction means they will go out and occupy the fullbacks, meanwhile the balanced CDM and the attacking Center mid have plenty of space to roam free in the middle.
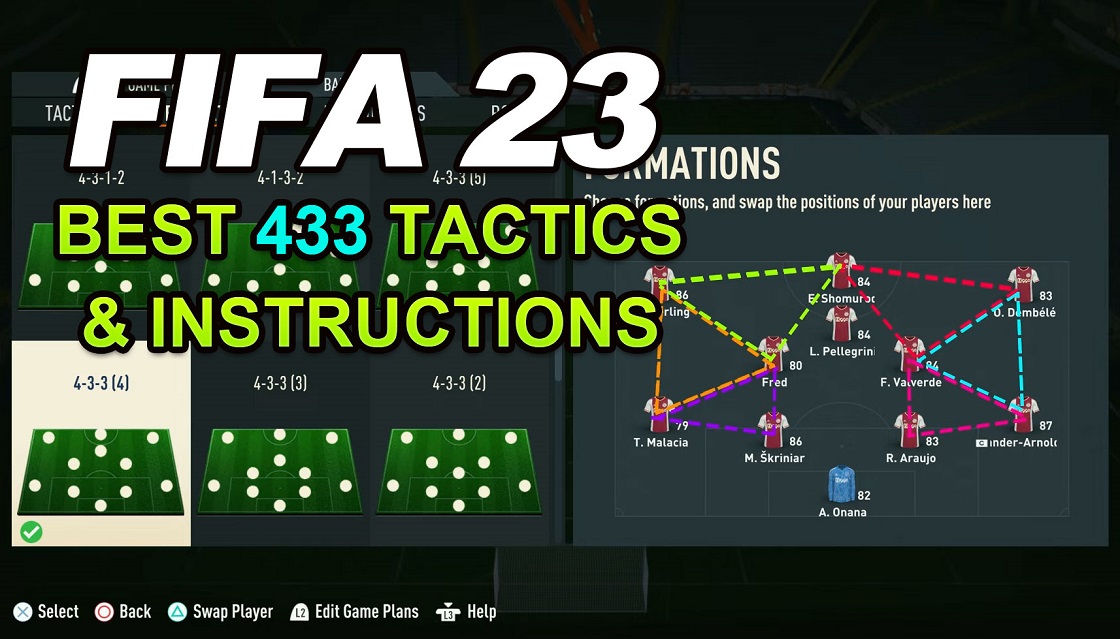
How To Setup the Custom Tactics & Instructions For 433 Formation in FIFA 23?
Let's get you set up alrighty, most of you know this but just to cover all bases in case you're new to the game, in this FIFA 23 Ultimate Team menu hits the L2 button go to custom tactics, and then hit L2 again and stick this new formation into one of these slots.
FIFA 23 Best 433 Custom Tactics & Instructions Setup Guide
So we'll quickly go through each tactic first of all and it's worthwhile listening to these just so you understand what each one does:
Best 433(3) Custom Tactics & Instructions in FIFA 23
Custom Tactices
Defence Tactics
Defensive Style: Balance
Width: 50
Depth: 65
Offense Tactics
Build Up Play: Balanced
Chance Creation: Direct Passing
Width: 60
Players in Box: 7 Bars
Corners: 1 Bar
Free Kicks: 2 Bars
Instructions
Striker Instructions
Support Runs: Stay Central
Attacking Support: Get In Behind
Interceptions: Normal Interceptions
Defensive Support: Basic Defence Support
Winger Instructions
Defensive Support: Basic Defence Support
Chance Creation: Stay Wide
Support Runs: Balanced Support
Support On Crosses: Get Into The Box For Cross
Interceptions: Normal Interceptions
Now you'll see this with the highlights coming up but having the Wingers on stay wide and get into the box for cross means they will hook the touchline and spread out your opponent's defense, but then when it comes to the final third, they will curve into the penalty area which is perfect for some really nice tick attacker passes, or if you prefer crossing, it's great for some back post crosses depending on what your play style is.
Central Mid. Instructions
Attacking Support: Get Forward
Support On Crosses: Get Into The Box For Cross
Interceptions: Normal Interceptions
Positioning Freedom: Stick To Position
Defensive Position: Cover Center
These are basically going to sit just in behind the striker and make some forward runs bombing on in behind, meaning we're going to essentially play with a striker and a shadow Striker just behind them.
Defensive Mid. Instructions
Defensive Behaviour: Cut Passing Lanes
Attacking Support: Balanced Attack
Interceptions: Normal Interceptions
Defensive Position: Cover Center
Positioning Freedom: Stick To Position
This is probably better put on your box to box CDM who's got a bit of good shooting and passing stats as well as the defensive side, so the other CDM is going to be your out and out defensive CDM player. The reason we're using drop between Defenders rather than stay back while attacking is drop between Defenders means they will always play centrally in between those two center-backs just in front, meaning if this CDM goes forward and helps with any attacks, we know 100% of the time that CDM will never go missing, they will always be there centrally ready to defend any counter-attacks that hit us. Whereas stay back while attacking means they sometimes do push forward and help out which is absolutely not what we want with this particular CDM.
Defensive Mid. Instructions
Defensive Behaviour: Cut Passing Lanes
Attacking Support: Drop Between Defenders
Interceptions: Normal Interceptions
Defensive Position: Cover Center
Positioning Freedom: Stick To Position
Full Back Instructions
Attacking Runs: Balanced Attack
Interceptions: Normal Interceptions
Attacking Support: Mixed Attack
Defensive Position: Stick To Position
Left back and right back is up to you depending how much of an advanced player you are with FIFA, if you're very confident in your defensive skills it is useful to leave them on balance, but for most people, we would say just go safe and have them on stay back while attacking, the rest of them should be on normal inceptions, mixed attack and stick to position. Same goes for the other fullback unless you're really confident in attacking just keep them on stay back while attacking
Center Back Instructions
Attacking Support: Stay Back While Attacking
Interceptions: Normal Interceptions
Defensive Position: Stick To Position
Goalkeeper Instructions
Saving On Crosses: Comes for Crosses
Saving Outside Box: Sweeper Keeper
Goalkeeper is up to you Champe, you can have quite aggressive so on comes for crosses and sweeper keeper but it doesn't really matter to tweak those to your play style
Best 433(2) Custom Tactics & Instructions
Custom Tactics
Defense Tactics
Defensive Style: Balance
Width: 55
Depth: 50
Offense Tactics
Build Up Play: Balanced
Chance Creation: Direct Passing
Width: 50
Players in Box: 6 Bars
Corners: 3 Bars
Free Kicks: 3 Bars
Instructions
Striker Instructions
Support Runs: Balanced Width
Attacking Support: Mixed Attack
Interceptions: Normal Interceptions
Defensive Support: Basic Defence Support
Winger Instructions
Defensive Support: Basic Defence Support
Chance Creation: Balanced Width
Support Runs: Balanced Support
Support On Crosses: Balanced Crossing Runs
Interceptions: Normal Interceptions
Central Mid. Instructions
Attacking Support: Balanced Attack
Support On Crosses: Balanced Crossing Runs
Interceptions: Normal Interceptions
Positioning Freedom: Stick To Position
Defensive Position: Cover Wing
Defensive Mid. Instructions
Defensive Behaviour: Balanced Defense
Attacking Support: Balanced Attack
Interceptions: Normal Interceptions
Defensive Position: Cover Wing
Positioning Freedom: Stick To Position
Defensive Mid. Instructions
Defensive Behaviour: Balanced Defense
Attacking Support: Drop Between Defenders
Interceptions: Normal Interceptions
Defensive Position: Cover Center
Positioning Freedom: Stick To Position
Full Back Instructions
Attacking Runs: Stay Back While Attacking
Interceptions: Normal Interceptions
Attacking Support: Mixed Attack
Defensive Position: Stick To Position
Center Back Instructions
Attacking Support: Stay Back While Attacking
Interceptions: Normal Interceptions
Defensive Position: Stick To Position
Goalkeeper Instructions
Saving On Crosses: Comes for Crosses
Saving Outside Box: Sweeper Keeper
Best 433(4) Custom Tactics & Instructions in FIFA 23
Custom Tactics
Defense Tactics
Defensive Style: Balance
Width: 55
Depth: 50
Offense Tactics
Build Up Play: Balanced
Chance Creation: Forward Runs
Width: 50
Players in Box: 6 Bars
Corners: 3 Bars
Free Kicks: 3 Bars
Instructions
Striker Instructions
Support Runs: Balanced Width
Attacking Support: Get In Behind
Interceptions: Normal Interceptions
Defensive Support: Stay Forward
Left Winger Instructions
Defensive Support: Basic Defence Support
Chance Creation: Balanced Width
Support Runs: Balanced Support
Support On Crosses: Balanced Crossing Runs
Interceptions: Normal Interceptions
Right Winger Instructions
Defensive Support: Basic Defence Support
Chance Creation: Balanced Width
Support Runs: Balanced Support
Support On Crosses: Get Into The Box For Cross
Interceptions: Normal Interceptions
Central Mid. Instructions
Attacking Support: Balanced Attack
Support On Crosses: Balanced Crossing Runs
Interceptions: Normal Interceptions
Positioning Freedom: Stick To Position
Defensive Position: Cover Wing
Attacking Mid. Instructions
Defensive Support: Basic Defence Support
Support On Crosses: Balanced Crossing Runs
Positioning Freedom: Stick To Position
Interceptions: Normal Interceptions
Defensive Mid. Instructions
Defensive Behaviour: Balanced Defense
Attacking Support: Drop Between Defenders
Interceptions: Normal Interceptions
Defensive Position: Cover Center
Positioning Freedom: Stick To Position
Full Back Instructions
Attacking Runs: Stay Back While Attacking
Interceptions: Normal Interceptions
Attacking Support: Mixed Attack
Defensive Position: Stick To Position
Center Back Instructions
Attacking Support: Stay Back While Attacking
Interceptions: Normal Interceptions
Defensive Position: Stick To Position
Goalkeeper Instructions
Saving On Crosses: Balanced
Saving Outside Box: Balanced
You can really use these tactics instructions to vary the way you play from tick attacker goals through the center to creating overloads out wide, here's how having a balanced attack on the fullbacks leads them to overlap to get themselves into crossing opportunities. His final look at how the wide players go out wide to stretch the opponent's defense before cutting inside with that get-into-the-box instruction to get into a goal scoring opportunity. Enjoy this formation Squad and remember it comes a champion approved! And if you want to get top-rated players for your 433 lineup, buy cheap FIFA 23 coins from UTPLAY.COM will help you build up meta team in short time!

Game Giveaways


5 USD
1 Winners
Beast
[Berserker Axe]
[Random]
[Berserker Axe]
[Random]
Available for:
-
 Steam Epic Games
 -
 Xbox
Xbox -
 PlayStation
 -
 Switch


![Grand Charms (Paladin)[40-42 Life & +1 Combat Skrills]](https://www.utplay.com/Images/D2/charm_large1.png)

FIFA 23 Related News